Monday, 18 June 2012

To windscreen or not to windscreen?

A few weeks ago Lady R posted about test riding a Fat Boy (of which she is now the proud owner – hooray for her!) and her newly discovered joy of riding without a windscreen. That post got me thinking about my own choices in that regard.
Unlike Lady R who had always ridden with a windshield, I had never ridden with one until I bought the Dyna. None of my bikes had a windscreen (you can’t really count the 1/2 race fairing on the RD350LC) and so I was quite used to hanging on for dear life at 80 or 90 and dodging June bugs as they headed straight for the tip of my nose or those big juicy grasshoppers that leave a bright yellow smear across your glasses, forehead, and helmet.
But since the Dyna did have a windshield I decided to try it out. It took a while but eventually I found a position that resulted in maximum wind shielding and minimum helmet buffeting. And I got hooked – or probably more accurately, lazy. Even though it was a quick-detach model, it just became easier to leave it on all the time, and so I did.
Then I read Lady R’s post and decided to ride naked for a change. (Clarification:  without windshield, not without clothing. I may not be ATGATT but I draw the line at exposing certain bodily parts to sunburn, flying and biting insects, and the possibility of road rash – not to say arrest.) One trip and I realized what I had been missing.
So now the default position is off. Certainly if there’s rain  or cold temperatures in the forecast, or a long’ish trip is in the works I’ll opt for the windshield – it’s much more comfortable and far less tiring than being out in the wind at speed – but for quick trips into town or over to the golf course the windshield stays in the garage. But my riding glasses need cleaning more often.
bug splatter

Tuesday, 12 June 2012

GoPro mount mod

I have managed to collect quite a few different GoPro camera mounts, all in an attempt to find the perfect mount that is stable, flexible, easy to use, and relatively inexpensive.
One of the major limitations of the GoPro mounting system is the lack of a ball and socket type mount that will allow tilt and pan motion of the camera itself. To get that capability I tried combining the RAM mounting system with the GoPro tripod mount. I purchased a yoke clamp along with a double socket arm from RAM.
 
Then I got a 1” plastic knob at the local hardware store and red-loctited a piece of 1/4 X 20 threaded rod into it. That then gave me a ball I could attach to the GoPro tripod mount.
             Tripod mount
Assembled it looked like this (In this configuration I have the camera clamped to the handlebar riser):

It worked well in all respects except for vibration. The 3” socket arm plus the various connectors meant that  the camera itself was some 5”-6” away from the hard mounting point on the bike, and those pieces, while pretty robust, still flexed and vibrated in the wind enough to make the videos all but unwatchable. (The Harley vibrates enough without any help from external forces.)
So I eliminated the arm as follows.
First I cut the ball off the RAM mount. Then I drilled a hole where the ball used to be and tapped it with a 1/4 X 20 thread.

I took a piece of threaded rod, cut it to length, and red-loctited it into the GoPro tripod mount.
The GoPro mount provides the tilt function, and for panning the camera turns on the threaded base. But to be able to keep it in one spot I needed some sort of a lock nut. I happened to have some flat steel lying around that I used to make a locking nut, but you could possibly find a 1/4 X 20 threaded knob at a machine tool place or even your local hardware store if it’s a good one.
Here are the pieces. The yoke clamp, drilled and tapped; the camera with the GoPro tripod mount attached with threaded rod and locking nut; and the 1” knob. (The knob can be used to convert the clamp back to a knob type for use with other RAM connections if needed for multiple purposes.)

Usage is simple. Thread the tripod mount all the way into the clamp, leaving just enough room for the locking lever to turn. Position the clamp on the bike wherever you want it (maximum opening is about 2”). Tighten the clamp. Aim the camera and then tighten the locking nut so the camera won’t turn. Tighten the GoPro tripod mount for the correct tilt, and you’re ready to go.
Here’s what it looks like now.
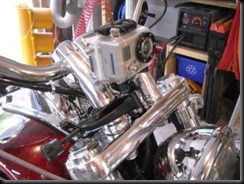
      
Initial testing shows a significant drop in camera motion. (See test video here.) There is, of course, the bike’s own vibrations to contend with but that is more a matter of staying in the right RPM range when filming. Still need to practise that more.
(If you’re interested in the RAM mounting system they also now have a yoke that includes a 1/4 X 20 camera mount option. Purchasing that unit instead of the yoke I have would eliminate the need to cut and drill the yoke itself. You’d still need the GoPro tripod mount, the threaded rod, and the locking nut. There is one advantage to drilling your own though, and that is you can mount the yoke either side up as the hole is drilled right through. This could be useful in tight fit situations.)
Now all I need is a way to remember whether the camera is recording or not. I have a data back but in bright sunlight, with sunglasses on, and at speed, it’s virtually impossible to see the little record icon, hence lots of footage of straight roads, the inside of jacket pockets, and so on.

Sunday, 27 May 2012

UPDATED: Update on Japanese Harley

So it seems this motorcycle isn’t going to be returned to its Japanese owner after all.  According to this story (link) the owner wants the bike to be displayed at the H-D Museum as a tribute to those who lost so much during the tsunami that hit Japan last year.
"I would be delighted if it could be preserved in its current condition and exhibited to the many visitors to the Harley-Davidson Museum as a memorial to a tragedy that claimed thousands of lives," Yokoyama said.
A classy move.
Japanese Harley 2(Photo: The Sunday Province)

Thursday, 3 May 2012

UPDATE: Japanese Harley washes up on BC coast.

Further to this story, the owner has been located in Japan. Although he survived he lost his home and several family members in the tsunami, so finding his motorcycle washed up on a BC shore was pretty special.
Even more special, Harley-Davidson, through a local dealer and its offices in Japan, have undertaken to have the bike returned to Japan where it will be refurbished and returned to its owner.
Awesome!
For more on this story: http://www.cbc.ca/video/#/News/Canada/BC/1258521056/ID=2229792507

Japanese-Harley4
Photo: Peter Mark/CBC

UPDATE: Japanese Harley washes up on BC coast

Further to this story, the owner has been located in Japan. Although he survived he lost his home and several family members in the tsunami, so finding his motorcycle washed up on a BC shore was pretty special.
Even more special, Harley-Davidson, through a local dealer and its offices in Japan, have undertaken to have the bike returned to Japan where it will be refurbished and returned to its owner.
Awesome!
For more on this story: http://www.cbc.ca/video/#/News/Canada/BC/1258521056/ID=2229792507
Japanese Harley
Photo: Peter Mark/CBC