I have managed to collect quite a few different GoPro camera mounts, all in an attempt to find the perfect mount that is stable, flexible, easy to use, and relatively inexpensive.
One of the major limitations of the GoPro mounting system is the lack of a ball and socket type mount that will allow tilt and pan motion of the camera itself. To get that capability I tried combining the
RAM mounting system with the GoPro tripod mount. I purchased a yoke clamp along with a double socket arm from RAM.


Then I got a 1” plastic knob at the local hardware store and red-loctited a piece of 1/4 X 20 threaded rod into it. That then gave me a ball I could attach to the GoPro tripod mount.


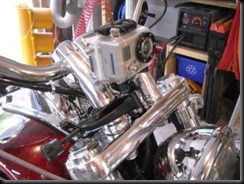
Assembled it looked like this (In this configuration I have the camera clamped to the handlebar riser):

It worked well in all respects except for vibration. The 3” socket arm plus the various connectors meant that the camera itself was some 5”-6” away from the hard mounting point on the bike, and those pieces, while pretty robust, still flexed and vibrated in the wind enough to make the videos all but unwatchable. (The Harley vibrates enough without any help from external forces.)
So I eliminated the arm as follows.
First I cut the ball off the RAM mount. Then I drilled a hole where the ball used to be and tapped it with a 1/4 X 20 thread.

I took a piece of threaded rod, cut it to length, and red-loctited it into the GoPro tripod mount.
The GoPro mount provides the tilt function, and for panning the camera turns on the threaded base. But to be able to keep it in one spot I needed some sort of a lock nut. I happened to have some flat steel lying around that I used to make a locking nut, but you could possibly find a 1/4 X 20 threaded knob at a machine tool place or even your local hardware store if it’s a good one.
Here are the pieces. The yoke clamp, drilled and tapped; the camera with the GoPro tripod mount attached with threaded rod and locking nut; and the 1” knob. (The knob can be used to convert the clamp back to a knob type for use with other RAM connections if needed for multiple purposes.)

Usage is simple. Thread the tripod mount all the way into the clamp, leaving just enough room for the locking lever to turn. Position the clamp on the bike wherever you want it (maximum opening is about 2”). Tighten the clamp. Aim the camera and then tighten the locking nut so the camera won’t turn. Tighten the GoPro tripod mount for the correct tilt, and you’re ready to go.
Here’s what it looks like now.

Initial testing shows a significant drop in camera motion. (See test video
here.) There is, of course, the bike’s own vibrations to contend with but that is more a matter of staying in the right RPM range when filming. Still need to practise that more.
(If you’re interested in the RAM mounting system they also now have a yoke that includes a 1/4 X 20 camera mount option. Purchasing that unit instead of the yoke I have would eliminate the need to cut and drill the yoke itself. You’d still need the GoPro tripod mount, the threaded rod, and the locking nut. There is one advantage to drilling your own though, and that is you can mount the yoke either side up as the hole is drilled right through. This could be useful in tight fit situations.)
Now all I need is a way to remember whether the camera is recording or not. I have a data back but in bright sunlight, with sunglasses on, and at speed, it’s virtually impossible to see the little record icon, hence lots of footage of straight roads, the inside of jacket pockets, and so on.


 This year’s Great Race was a circumnavigation of the Great Lakes. Starting in Traverse City Michigan, the race had an overnight stop at the end of Day 4 in Kanata, Ontario (a suburb of Ottawa). It’s only about a 45-minute ride so as soon as I heard the Race was coming here I put it in my calendar. When you have 90 vintage cars arriving on your (almost) doorstep, some of which you’ll never, ever see otherwise, of course you have to go.


 Participants in the motorcycle blogosphere generally have 2 main interests in common – we ride motorcycles and we take photographs of our travels to share online and with friends and family. So I was intrigued by a message I got from John Flores, a contributing editor to RoadRUNNER magazine, asking me to review an e-book he’d written on that very topic.


